Friday, January 6, 2012

Beer Cup Light Sphere


At first glance this may look like an ordinary, store bought, spherical pendant light - but upon closer inspection one will notice it's unique composition. This entire sphere is in fact made from white plastic beer cups, glued together with a glue gun!

 Here's some photos of Pelle, my husband, putting the whole thing together.

 
At about 1/4 complete, the curve of the sphere begins to show.


Pelle used about 150 cups to make the sphere. As plastic cups are extremely inexpensive, we ended up only spending around $18.00 on this project.


Almost complete...


Oops!


Here is the final product. Pelle added a dimmer switch to the equation and now we have a much nicer light above our bed, and it only cost us $18.00! 

On another note, I suppose one could also create their own light sphere using only recycled cups; that is if one had access to the right kinds of recycled materials. Perhaps that would be a good project to undertake after a most excellent keg party. Note to self.

Jackie

Saturday, December 31, 2011

Home Made Gifts for the Holidays

This year we had a tight budget for Christmas - a tricky situation when one is fortunate enough to have a pretty big group of friends and family! (Not that I'm complaining!) So, we decided to set ourselves an approximate budget of ten dollars per person, and make tasty gifts for people. The result? Two kinds of cookies and Swedish Christmas vodka!


We infused the vodka with brown sugar, cinnamon, cardamom, cloves and orange. We went to a second hand store and picked out five different and interesting bottles to put the vodka in. Then we washed them, plugged them with various corks and red stoppers, and gave each a bow!


Here I am decorating the sugar cookies!


We went to Michael's and bought Christmas baking gift bag sets - they were really easy to use and ended up looking great! They each came with cardboard circles for the cookies to rest on, cellophane bags, red ribbons, and cute little to/from tags. Each bag contained some simple sugar cookies as well as my favorite, chocolate chip button cookies!

I went to the Bay and bought some little ornaments (on sale) and attached them to a few of the bags. Buying ornaments, and attaching them to gifts is something that I have been doing at Christmas time for a few years now. I always go to the Hudson Bay Company during the week leading up to Christmas; they always have a great selection of ornaments at that time of year and they're always marked down (usually $1 - $2 per ornament!).


I also thought I would share this photo of our apartment, decorated for Christmas! And of course, what blog post of mine wouldn't be complete without a complimentary cat photo?


Merry Christmas and Happy New Year!

-Jackie

Sunday, October 16, 2011

Gabriel Ross Photo Contest - Part 2

As you may recall from a previous blog post, back in June I entered into a photo contest at a local modern furniture store here in Victoria BC called Gabriel Ross. Well the results were that my photo won first place and I received a credit at the store! (Yahoo!)


As a side note, I have had a lousy cold this weekend and have basically barricaded myself into my apartment for several days trying to recover. Yesterday when I could take no more cabin fever, I set out up the street to go peruse their selection and see if anything sparked my interest. My haul? I purchased a bright red glass Chat-Board for my kitchen. 


The Chat-Board is a Danish product and is essentially a super sexy magnetic whiteboard (for writing on with dry erase markers). I was tired of writing down reminders and grocery lists on pads of paper on the fridge and I wanted something simpler and better looking. I'm sure that in the future as friends and family trickle in and out of our home the board will receive many artistic contributions and will be a source of interactive entertainment.


Here's a photo from the Chat-Board website of a wall of  different Chat-Boards. 

These pieces are fab because they come in so many sizes and colors! One could even purchase several of the largest size boards and tile the walls of a room giving it a contemporary and glossy look as well as a new practical function. How amazing would that be for a creative environment such as a play room for children or an artist's studio?

Jackie

Caitlin's Bridal Shower: Bumble Bees But No Wasps Please!

Here's a look at the bridal shower party I threw for my amazing friend Caitlin in August this year. Thankfully we had great weather as it was an outdoor patio party. If you read a few blog posts back you will see the invitations for this get-together as well! 


Enjoy the photos!


Here are the mini cupcakes I had made for the party. They were topped with these totally cute fondant bumblebees! The folks at Ooh La La Cupcakes did such a great job.


We had a table set up at the party for a silent guessing game. Different photos of the bride at different ages were displayed and throughout the party guests could walk over and write down how old they thought she was in each. The winner got a cupcake baking gift bag!


Some of the ladies hanging out under the shade of the tent.


These were the party favors the ladies got to leave with - Yummmmmmm, local honey!


Caitlin opening some of her gifts with a little help from her adorable niece.


Did mother nature somehow know the theme of this party? I'm not sure if it was the gravlax, the mimosas or just the weather, but these jerks were definitely party crashers! 


(But as you can see they endured a drunken citrusey demise)


Here is the paper banner I made for the party with a lot of help from my friend Kristal and her Cricut Personal Cutting Machine. She also cut out yellow, black and grey paper circles for me which I strung string though to make several hanging garlands which were tied to the perimeter of the patio tent. They looked fabulous, especially with all the yellow and black bunches of balloons we had placed around the patio - but unfortunately I didn't get a great photo of them.


Hope you liked the photos.
-Jackie


Friday, July 22, 2011

Open Concept - Who Needs Walls?


The place I call home is an apartment in a hundred year old brick heritage building in down town Victoria BC in the Design District. I loved this space from the moment I laid eyes on it and was over the moon when my husband called me at work one day to tell me that our landlord had accepted our application as tenants. We've lived here for the past three and a half years and during this time I've had a blast making the space our own, one piece at a time.

One interesting feature in the main living space of our apartment, is that is has a built in folding wall on hinges, which creates the option of having an additional room with privacy or an entirely open space. For the past three and a half year we've lived here with our bedroom tucked away in the optional room, walls folded out. We always wanted to try folding the wall back and opening the room up to join our sleeping, living and dining areas but it took us a long time to get around to it because we enjoyed the cosiness and privacy of our bedroom and we knew that making the change was going to be a lot of work. 

Recently when feeling the need for a change and somewhat ambitious, we decided to go for it! And now I can't believe we didn't do it sooner! As we predicted, the improvement was amazing. The space is so much bigger now, and easier to live in; it's easier to move around in and to clean too. It's also a real treat to be able to lie in bed and see the whole apartment and the windows, and talk to the other person from bed if they're in the kitchen or the living or dining spaces.

I've also come to the conclusion that walls and bedroom privacy are not as important to me as I thought they were. After all we live alone and although we do have the occasional house guest who will sleep on our sofa or the fold out bed in the office, they're few and far between and usually they're close friends or family :)

I'm glad to say this rearrangement has given me one more reason to enjoy our space, and one more thing to share on the Government Street Blog! I only wish we'd done this a long time ago, but perhaps there's a lesson there. So here's to positive change, and to actually doing the things that we say we're going to do!


I was a bit concerned that the folding wall was going to look out of place in the room when folded flat, but with the bed pushed up against it and the big blue painting (by the very talented Seattle artist Elena Korakianitou Pors) hanging above it's actually not that bad! It almost feels like it's a headboard.


Yes, Potato knows she matches, and she knows she looks good...


 Our smaller television, which was previously mounted in our bedroom closet (we had to open the closet doors to watch it) now hangs on the wall in the photo above and sits at a much more comfortable watching distance from bed. Life is good!


Here's another angle of the open space. Pants Boy's on the table looking suave (as per usual) and Pelle is throwing up the dubs. I love you Pelle.


One more shot of the new, bigger, brighter and better space!

Thursday, July 21, 2011

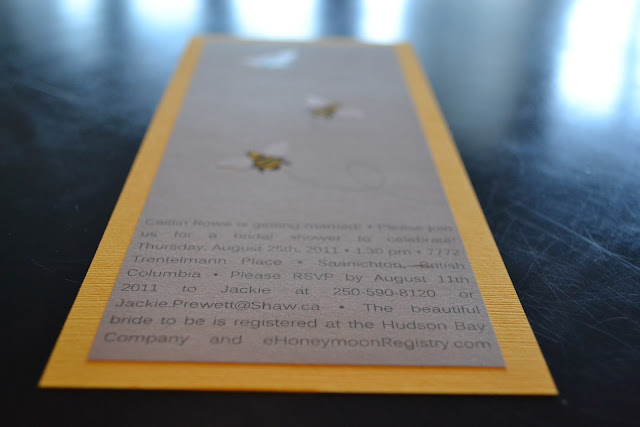
Bumble Bee Bridal Shower Invitations


These invitations may have bees on them but they're certainly not too busy! I was very happy (and relieved) this weekend to finally get these bad boys all finished up and sent out as the shower is in August, and the clock is ticking! I'm really looking forward to this party, which I'm throwing for one of my best friends in the whole-wide-world, Caitlin, to celebrate before she ties the knot with her other half Pat; a guy who everyone agrees is absolutely perfect for her :) 

liked making these invitations because I really think they suit my friend's style! They're simple and somewhat contemporary, with a clean font on a shimmery grey backdrop - but - they're also playful and friendly with a pop of yellow and three little bees buzzing around! Perfect for a summer party thrown for a stylish chick who's always been a sucker for cute things! (Caitlin you know you are!)

As Caitlin's already seen the invites I really don't have any reservations about posting these pictures. That being said, I don't want to reveal any of the other details of the event until after the fact, so more pictures and posts will have to come at a later date. Stay tuned!

Jackie


Sunday, July 10, 2011

Grolsch Bottle Cap Upcycled


Last night we had some friends over and one of them was drinking Grolsch beer. I was admiring the bottle today while I was gathering my recycling when I decided to remove the swing top cap and keep it (thank you Sara!). Pelle (my husband) sawed the bump off the back of it for me and then I epoxied it to a small round magnet. As you can see it actually turned out to be a pretty cool and somewhat retro little fridge accessory. It also really reminds me of a trip I took to the Netherlands to visit my brother when I was in high school, a happy memory. 

Hooray for upcycling!
Jackie